Choose the right property
Open Search Console using an account the business controls. Choose Domain to cover all protocols and subdomains, or URL prefix to separate a specific section such as https://www.example.com/. Domain properties require DNS verification. For URL-prefix properties, choose one of the verification methods Search Console offers.
1. Add the site you actually publish
Start at search.google.com/search-console in a Google account controlled by the business. Open the property selector and choose Add property. Enter example.com without a protocol or path for a Domain property. If ownership must cover only your store or a managed subdirectory, enter the exact HTTPS URL for a URL-prefix property. A prefix for https://www.example.com/ covers that version; http://example.com/ or a different subdomain is outside that prefix. For a company site, confirm which hostname visitors reach after redirects before settling on the property you will report from.
Decide who will maintain ownership before making changes. Keep a verified business owner and grant teammates or vendors the access they need from Settings instead of sharing the owner’s sign-in. Search Console reports Google organic search activity and indexing status. Link it to your release checklist so someone will return to the reports after publishing.
- Choose your scopeSelect a domain or a precise URL prefix
- Confirm controlPublish the ownership proof and verify it
- Check discoverySubmit the sitemap and inspect a priority URL
Illustrated interface walkthrough with example data. Labels and available options may vary by account.
- Add a property
- Domain
- example.com
- Coverage
- All subdomains and protocols
Choose Domain when you control DNS for the whole domain. Enter the domain name without https:// or a path.
- Add a property
- URL prefix
- https://www.example.com/
- Coverage
- URLs starting with this prefix
Use a URL prefix if you need a specific hostname or path, or a supported alternative to DNS verification.
Verify ownership and submit your sitemap
For DNS verification, copy Google’s TXT value to the DNS provider that hosts your active nameservers. Existing TXT records can stay. After verification, open Sitemaps and submit the sitemap URL for the chosen property. A successful submission means Google could process the sitemap. Check important individual pages through URL Inspection.
2. Verify ownership, then submit the live XML
For a Domain property, open the DNS controls at the provider listed by your domain’s authoritative nameservers. Add the TXT record exactly as Google presents it. Providers often represent the root with @ or an empty Name field. Use your provider’s instructions. Save the record, return to Search Console, and select Verify. If Google cannot see the record yet, confirm the active DNS zone and allow time for the change to propagate. Keep the verification record in place after success.
For a URL prefix, use the method Search Console offers and your access supports. If you upload the provided HTML file, confirm its exact public URL works in a signed-out window. If you choose the HTML tag method, publish the tag in the homepage’s HTML head and check the page source on the live site. Once verified, open Sitemaps and enter the live sitemap location shown for your property. A successful report means Google was able to read the sitemap. Check the site’s important URLs separately.
Illustrated interface walkthrough with example data. Labels and available options may vary by account.
- DNS record
- Type
- TXT
- Name or Host
- Root of example.com
- Text value
- Use the exact token shown in your account
Add this at the DNS host first. Then return to Search Console. Keep any existing TXT records.
- Sitemaps
- Current property
- example.com
- Add a new sitemap
- https://www.example.com/sitemap.xml
Open the live address yourself first. Use the path or full URL according to the field shown in your property.
Troubleshoot verification and indexing
If verification fails, check that the TXT record is on the correct hostname and that you edited the active DNS zone. If the sitemap cannot be fetched, open it in a private window and verify it returns XML over HTTPS. For an individual page, compare the indexed result with a live test, then check access, canonical selection and noindex before requesting recrawling.
3. Inspect a representative page and triage failures
Paste the full URL of an important service or product page into URL Inspection. Read the indexed result first. Compare the user-declared and Google-selected canonical if available, and check the last crawl time. Then select Test live URL after a fix to see what Google can access now. If the live URL is eligible, an owner or full user can request indexing. The live test and request provide useful signals for diagnosis. Google can still choose a different canonical or decline to index the page.
For a sitemap fetch issue, check the exact submitted URL, the live HTTP response, and whether hosting, a firewall or an authentication prompt prevents access. For a missing page, look for a redirect, robots.txt crawl restriction, noindex directive, broken render, or conflicting canonical. Record when the fix went live so you can distinguish older indexed data from the new result. If problems affect a whole template, fix the shared cause before requesting recrawls for a sample.
Illustrated interface walkthrough with example data. Labels and available options may vary by account.
- URL Inspection
- URL
- https://www.example.com/services/
- Indexed result
- Review page indexing and canonical
The live test describes current access. The indexed result describes the copy Google previously processed.
- Live test
- Example result
- URL is available to Google
- Before requesting
- Confirm the correct production URL
Use the request for a small number of priority URLs after resolving issues. Google considers the page independently.
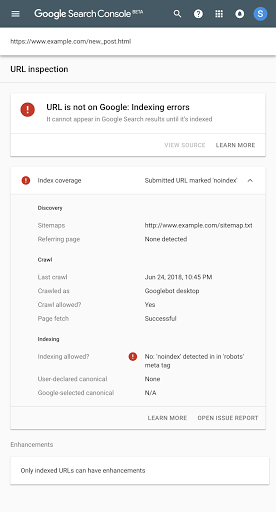
Google’s 2018 URL Inspection screenshot illustrates a noindex exclusion. Your report may look different. Google Search Central’s original walkthrough.
A launch-day verification example
A business moves from a preview address to https://www.example.com/. Its owner verifies example.com through DNS, submits the production sitemap, and inspects the homepage, a service page and a contact page. The service page’s canonical points to the preview site. The team fixes the shared template, reruns the live test and inspects another service URL before requesting indexing. One change fixes the same problem across the service section.
When you hand the issue to a developer or agency, share the public URL, property type, report status, and an approximate time when the change went live. Redact any private account details or verification tokens. That context gives the person helping you enough information to compare what the server returns with the report you are seeing.
| What you see | What to check | Next action |
|---|---|---|
| Ownership verification failed | Active DNS zone, exact TXT record, hostname and propagation | Correct the record at the DNS provider and try Verify again |
| Sitemap couldn’t be fetched | Public HTTPS response, redirects, firewall and XML content | Fix access or submit the correct production sitemap location |
| Google selected a different canonical | Internal links, redirects, sitemap entries and the page’s canonical preference | Align the signals around the URL you want indexed |
| Page is crawled but currently not indexed | Useful primary content, duplication and the page’s purpose | Improve the page and review comparable URLs before asking for a recrawl |
Common questions
Is Search Console free?
Yes. A verified owner or invited user can use the reports without buying ads. Search Console and Google Ads serve different purposes.
Does verifying a property put the site on Google?
Verification gives you access to the reports for that property. Google discovers and evaluates public pages independently. Use the sitemap and URL Inspection to see how it is processing your site.
Do I have to submit every URL by hand?
Use a sitemap and normal internal links for a group of pages. URL Inspection is useful for a small number of important URLs, especially after a fix.
Can I submit a localhost or private preview?
Google needs a reachable public URL to crawl. Keep private environments restricted and submit the production URLs after launch.
What to check next
- DNS ownershipTXT record visible at authoritative nameservers
- SitemapSuccessful fetch and intended canonical URLs
- URL InspectionCorrect property and live page accessible
Further reading and official documentation
- Google Search Console: add a property
- Google Search Console: verify site ownership
- Google Search Console: Sitemaps report
- Google Search Console: URL Inspection
- Google Search Central: request recrawling
- Google’s example of the URL Inspection interface
Stuck on DNS verification, sitemap access, or an indexing error? Send us the public URL and the message you see in Search Console. Contact Orbilect SEO.